Home > Databases > Materials
Materials
|
Overview: The Materials Database is used to create and maintain list(s) of materials and supplies within the estimating program. Even though the use of the materials database is optional within the estimating program, if used properly, it can be a powerful tool that makes entering this data into an estimate easier and quicker, as well as providing additional information about an estimate by generating materials reports within an estimate.
In addition to using the material codes within an estimate, lists of materials and supplies can be easily printed from this module. The lists can be sorted based on material code, material type, or category.
NOTE:Throughout this chapter, and the entire program, the term "Materials" is used to identify both materials and supplies.
|
|
Materials can be entered into the database utilizing either of two methods. The first method involves adding the materials through the Materials Database, as explained in this chapter. The second method involves adding materials to the database “on the fly” (as the materials are entered in an estimate). Whichever method is used, it is highly recommended that the numbering system should be somewhat consistent throughout the database.
|
|
In addition to the Materials Database, this chapter also addresses the following topics:
- Asphalt Mix Design Data
- Material Category Database
- English
- /Metric Units Database
|
|
Figure 1, below, shows the main window for the “Material Database.” From the "Material Database" window you can add, delete, edit, and print. There are two ways to implement the material database.
| Single Database |
With this option, there is only one material database. All crews and estimates will reference this one “master” material database. This is the default setting for the system. With this option, the material and subcontractor databases will operate similarly.
|
| Multiple Databases |
With this option, you can have a different material database for each pay item database in addition to a master database. This option allows the user to set up different material items and/or different material prices in each database. This operates like the labor and equipment databases and, like those databases, we recommend that you use the same material codes from one database to the next to allow different saved crews (or tasks) to seamlessly move from one database to the next.
|
|
|
To use the Multiple Database option, simply open the Program Preferences screen and check the “Use Multiple Material Files’ option on the General tab.
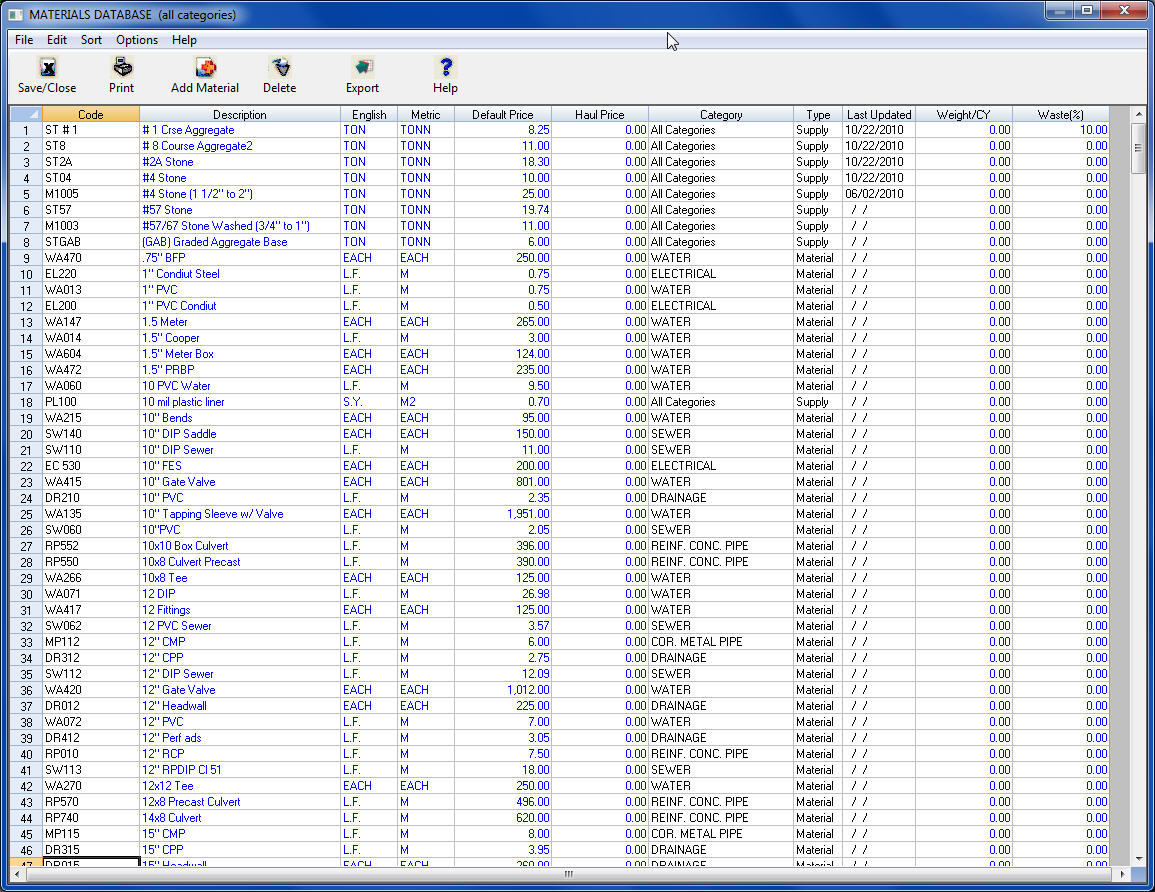
Figure 1
|
| Toolbar |
The “Toolbar” at the top of the screen gives you quick access to commonly used menu commands. Listed below are descriptions of each button:
|
 |
Press the SAVE/CLOSE button to save and close the material database window. |
 |
Pressing the PRINTER icon will display the report options screen for the material database. See the FILE: PRINT section later in this chapter for all the report options.
|
 |
Press Add Material to add a new record to the current material database. |
 |
Press DELETE to delete the currently selected material item from the database. |
 |
Press Export to export the current material database to an Excel spreadsheet file. |
|
| Spreadsheet Columns |
The material database spreadsheet contains a number of columns where you can enter data. Listed below are detailed explanations of each column.
|
| Code |
This field is NOT editable from this screen. This is a unique 15-character code that identifies each material item. To change a code number you must delete the old item and add a new item. |
| Description |
The description field can be up to 100 characters in length. |
| English |
This field is for the ENGLISH unit of measure for each item. In order for the system to be able to convert units of measure (from English to Metric or vise versa), you must enter a unit of measure type found in the UNITS DATABASE. After you type in the unit of measure and press ENTER, the system will attempt to “standardize” the item you typed in. For example, if you type in “lf,” the system will convert it to “L.F."
|
| Metric |
This field is for METRIC unit of measure for each item. In order for the system to be able to convert units of measure (from English to Metric or vise versa), you must enter a unit of measure found in the Metric Units Database. After you type in the unit of measure and press ENTER, the system will attempt to “standardize” the item you typed in. For example, if you type in “meter,” the system will convert it to 'M'.
|
| Default Price |
This is the “default” unit price for each material item. The price you enter here can be changed within any estimate, mix design or crew.
|
| Haul Price |
The haul price is only used in the Asphalt (and Concrete) databases. Just as with the “Default Price” the price you enter here is only the default value and can be changed within any mix design.
|
| Category |
This field allows you to enter a category for each material item. The advantage of using material categories is when selecting materials for a task (or crew) you can quickly narrow your search based on specific categories of items. The larger your material database, the more helpful this option becomes. To enter or change a material category, simply double click on the category column and a list box will be displayed (Figure 2) allowing you to select the material category to use for the current item. Please see Material Categories Database in a following chapter.
|
|
|
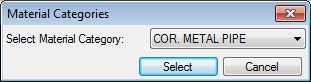
Figure 2
|
|
The material categories are user defined. See the Material Categories Database section later in this chapter for more information on adding or editing the category database.
|
| Type |
This field allows you to identify each item as either a Material or a Supply. Within the estimating system, you can track specific totals for tasks, pay items, and the entire project by both materials and supplies. To change this value within the database, simply double click on the word “Material” or “Supply” and the system will automatically toggle between the two options.
|
| Last Updated |
This field displays the date that the default unit price was last updated for the current item. |
| Weight/CY |
This field allows you to enter the material weight (in pounds per cubic yard). This value is most usefull in the trenching sheet to calculate the amount of bedding stone.
|
|
| ADDITIONAL MENU OPTIONS
Listed below are the different options available from the equipment database menu.
|
| EXPORT TO EXCEL SPREADSHEET |
This option allows you to export the current spreadsheet view to a Microsoft Excel spreadsheet. After selecting this option, simply select the file name and location to save the file, Figure 3, below.
|
|
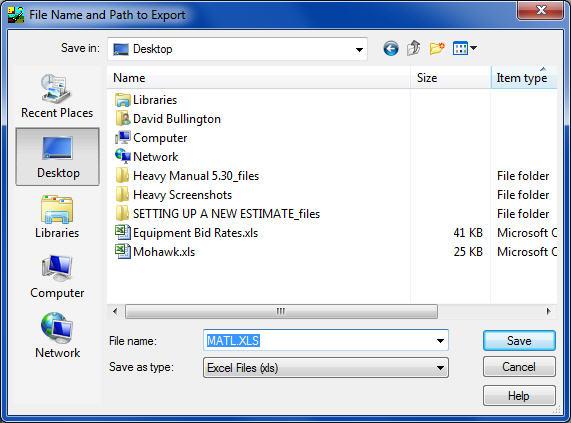
Figure 3
|
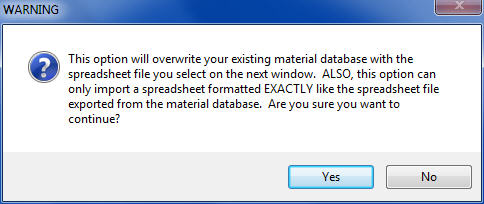
| IMPORT FROM EXCEL SPREADSHEET |
This option allows you to import material data from a Microsoft Excel spreadsheet. Selecting this option will display the warning shown below.
This option should only be used to import a spreadsheet that was previously exported from ProEstimate Heavy. This will ensure that the file is properly formatted.
|
|
|
| FILE: PRINT |
This option allows you to print the material database. See the Material Database-Report Options chapter for more information on available report options.
|
| EDIT: ADD NEW ITEM |
Use this option to add a new material item to the database. After selecting this option you will see the screen shown in Figure 4. Enter the information on this screen and press the SAVE button. You must enter a material code, description and units of measure for each item. You can always change these values from the spreadsheet view.
|
|

Figure 4
If you are not sure what code to use, or to see a listing of all the existing codes in the database, press the “Pick Code” button. You will then see a window similar to the one shown in Figure 5.
|
|
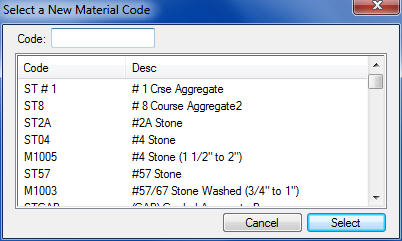
Figure 5
You can then type in the desired code in the “Code” box at the top. As you type, the window showing all the material items will automatically scroll to the next matching item. Once you have enter the desired code, press the SELECT button and the new material code will automatically be inserted into the New Material Item window.
|
| EDIT: DELETE ITEM |
This option allows you to delete material items from the database. To delete a single item, simply click anywhere on the row of the item to delete and select the EDIT: DELETE ITEM menu option. You can also RIGHT CLICK and select DELETE CURRENT ITEM from the pop-up menu.
To delete MULTIPLE ITEMS, use the CTRL or SHIFT keys in conjunction with clicking on the rows to delete then select the EDIT: DELETE ITEM menu option.
| CTRL-CLICK |
The CTRL key allows you to select non-sequential item. While holding down the CTRL key, simply click on each item to delete.
|
| SHIFT-CLICK |
The SHIFT key allows you to select sequential items. Click on the starting item to delete, then while holding down the SHIFT key, simply click on the last item in the sequence. All the items in between will be marked and you can then select EDIT: DELETE ITEM to delete all these items.
|
|
| EDIT: CATEGORIES DATABASE |
This option allows you to edit the Categories Database. The categories database allows you to set up a user defined list of material categories that you can assign to different material items. See the section later in this chapter for more information on editing this database.
|
| EDIT: UNITS DATABASE |
This option allows you to edit the Units Database. The units database allows you to modify the units of measure that are available within the entire system. The metric conversion factor is also stored in this database. See the section later in this chapter for more information on editing this database.
|
| SORT |
There are a number of different orders the Material Database can be sorted.
You can also change the sort by double-clicking on the column headings.
| Code (ASCII) |
Sorts on the character value of the material code.
|
| Description |
Sorts on the material description.
|
| Category Code |
Sorts on the category then the material code.
|
| Category Desc |
Sorts on the category then the material description.
|
|
| OPTIONS: FREEEZE COLUMNS |
This option allows you select the number of columns to lock (or freeze). A frozen column will not scroll off the left side of the screen and will always be visible.
|
| OPTIONS: FILTER DATABASE |
This option allows you to filter the database to see only a selected category of material items. For example, you can filter the database to see only the Bridge related items. Simply select the FILTER menu command and select the desired category from the displayed list box.
|
|
Figure 6
|
|
See also