Overview: The Pay Item Database is used to maintain Pay Items Files for different states or any other bidding authority, including files of Pay Items for private work. There is no limit to the number of pay item files that can be set up and maintained, nor is there a limit to the number of Pay Items within each file (limited only by available memory). This database is also used to store the name of the bid program data file that the State uses to store the bid information.
In addition to maintaining a list of Pay Items, the Pay Item Database is also used to enter and maintain plug prices as well as state average bid prices (from BidTabs Professional) for each Pay Item. Using plug prices allows the estimator to easily set up jobs and run preliminary estimates to determine job size, subcontractor totals, and breakdowns by type of work.
An additional advantage in maintaining a Pay Item Database is to allow for projects to be quickly set up by picking Pay Items to be included in a job from the Master Pay Item File (See Estimating/Advanced Options) for more information about "batch loading" Pay Items into a job from a Master Pay Item Database).
To EDIT a Pay Item file, select "DATABASES: PAY ITEM DATABASE" from the Main Menu. The default Pay Item Database will be displayed as shown in Figure 1; you can change the default file from the Program Preferences Screen.
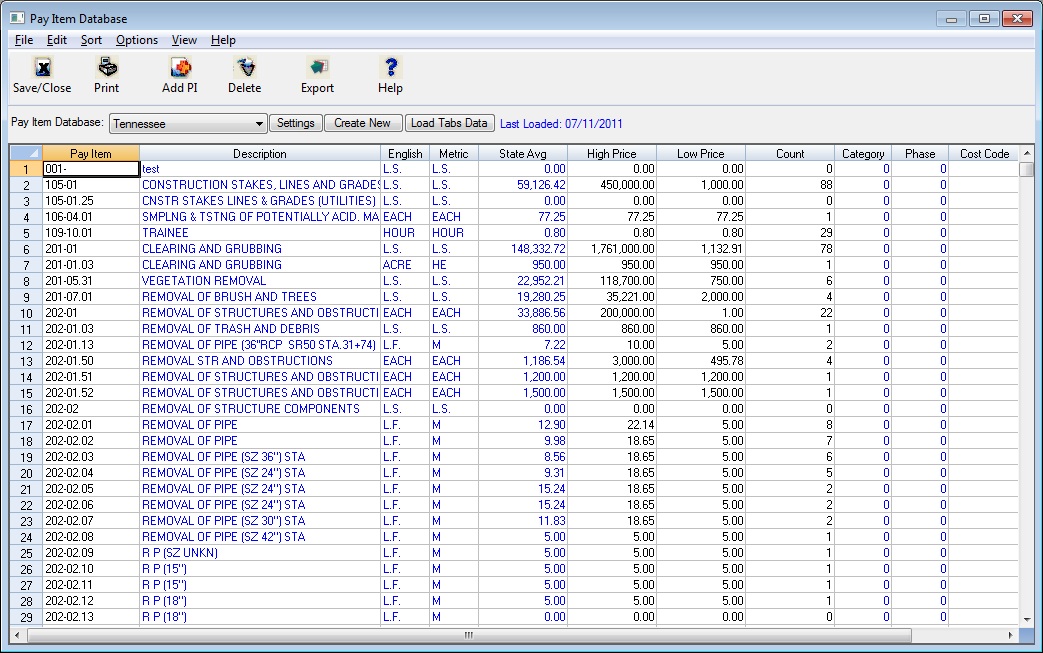
Figure 1
|
Toolbar |
The “Toolbar” at the top of the screen gives you quick access to frequently used menu commands. Listed below are descriptions of each button: |
|
|
|
|
Save/Close |
Press the Save/Close button to close(and Save) the pay item database window. Whenever you close the pay item database, you will be prompted if you want to save any changes you made. Answer YES if want to keep any changes made to this database. |
|
|
Selecting the PRINT button will display the report options screen for the pay item database. (See the FILE: PRINT section later in this chapter for all the report options.) |
|
Add PI |
Select the Add PI button to add a new record to the pay item database. |
|
Delete |
Select the Delete button to delete the currently selected pay item from the database. |
|
Export |
Select the EXPORT button to export and save the current spreadsheet to an Excel-compatible spreadsheet file. After selecting this option, you will be prompted to enter the path and file name of the spreadsheet file to create. |

Spreadsheet Columns The pay item database spreadsheet contains a number of columns where you can enter data. Depending on the “View” option you have selected, the system will either display plug unit costs for seven different cost types OR state average price data.
|
Pay Item (Number) |
This field is NOT editable. To edit a pay item you must delete the old item and add a new item. |
|
Description |
The pay item description field can be up to 45 characters in length and is editable. |
|
English |
These two fields are the English and Metric units of measure for each pay item. If you type in a unit of measure (either English or Metric) the system will attempt to convert it to a standard unit of measure in the UNITS DATABASE (for example, if you type in “cy,” the system will convert it to “C.Y.”. |
|
State Avg, High, Low, Count |
These fields are displayed if you select the VIEW: STATE AVERAGES menu option. The only field in which you can enter a price is the “State Average.” These prices are automatically loaded when you load price data from BidTabs Professional. The “count” field is the number of matching records that were found that costitute the average. |
|
Category |
This field allows you to enter a default category. Within the estimating system you can categorize (or group) pay items allowing you to view and print totals by category. This field is only the default category and can be changed once the pay item is loaded into an estimate. |
|
Phase Code |
This field allows you to enter a default phase code. Within the estimating system, when you export data to an accounting system, you will be required to enter a phase code for each pay item (or task). This field is only the default phase code and can be changed once the pay item is loaded into an estimate. |
|
Pay Item Database |
This dropdown list-box allows you to change to a different Pay Item Database. To change databases, simply click on the down arrow and select from the displayed list. The list will display all of the available databases. When setting up a new estimate, only those databases that have been previously set up on your system will be available for use within the estimate. |
|
Settings |
This option will display a window allowing you to enter certain information about the current pay item database. (See the FILE: DATABASE SETTINGS section later in this chapter for more information on this screen.) |
|
Create New |
This option allows you to create a new pay item database. As mentioned earlier, you can create pay item databases for any bidding authority, not just DOT’s. You can even create a pay item database for private work. |
Listed below are the different options available from the pay item database menu.
Figure 2 shows the “State Set-Up” screen. The settings on this screen apply to the Pay Item Database as a whole, not to an individual pay item.
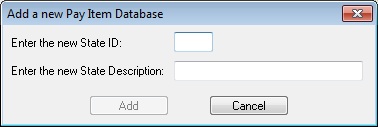
Figure 2
|
State ID |
This field is used to enter a two-character abbreviation for the pay item database. Both characters must be letters from A to Z (no other characters are allowed). NOTE: It is NOT required that a Pay Item file be a State. Pay Item files can be set up for any municipality, the FAA, the COE, or a completely internal list of Pay Items. |
|
Description |
This field is used to enter a description of the pay item database. Once again, it is not required that it be a state. This description will be displayed when you see a list of available pay item databases. |
|
ADD |
After you have entered the previous two fields, you can then press the ADD button to create an empty pay item database. You will then see the Database File Options screen. See the next section for the options available on this screen. |
|
* HELPFUL HINT *
If the Pay Item number contains ANY characters other than the numbers 0-9 (i.e., dashes, commas, or periods), You MUST sort the database based on the Character value. |
|
After you create a new pay item database or by pressing the SETTINGS button you will see the screen shown in Figure 3. This screen allows you to change certain settings that apply to the current pay item database.
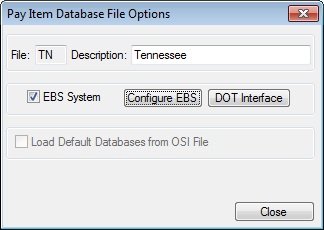
Figure 3
| File: | This a 2 character file designation. If the file is for a DOT it should be the 2 character designation for that particular state. | ||||
|
Description |
This field is for the name of the pay item file. | ||||
|
EBS System |
This option is used to tell the system if the DOT program file is supplied by EBS (also known as Expedite). |
||||
|
Configure EBS |
This button will attempt to configure the EBS program to import and export CS2 files. This option is only available if the EBS System block is checked. This is the file format Pro Estimating HEAVY uses to import and export files from the Expedite system. For this option to work properly you must already have the EBS system loaded on your computer AND the correct program path must be entered. |
||||
|
Load Default Databases |
(If this option is not available, then a default database is not available for this state.) Checking this box will load default information for the current pay item database. Information included in the default database will depend on the information available from the DOT. This information can include:
|
||||
|
Close |
The “Close” buttons will SAVE the information entered above for the current Pay Item Database and close this window. |
This option allows you to load historical averages into the current database from the Omam Systems BidTabs Professional program. Three things MUST be true before you can use this option:
(1)
You MUST have the BidTabs Professional program installed on your computer; AND
(2)
The proper BidTabs Professional program path must be entered on the Program Preference screen; AND
(3)
You must have subscribed to the state specific DOT Database in BidTabs Professional.
** NOTE **
When you load prices from the BidTabs Professional program, the system will automatically add any Pay Items contained in the tabs database that are not in the current database.
If these are all true, you can then load state averages into the Pay Item Database. After pressing the “Load Tabs Data” button, you will see the Load Tabs Data option screen shown in Figure 4, below.
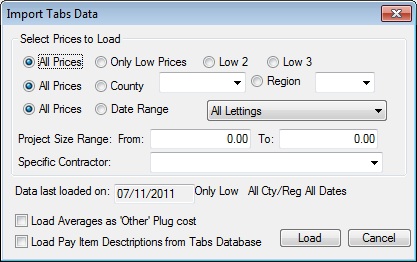
Figure 4
|
Select Prices to Load |
These options allow you to select from All Prices, Only Low Prices, Low 2 or Low 3. Selecting Only Low will include only those prices from the low bidder on each project. (Even though the price for a specific Pay Item may not be the lowest on a specific project, the price will be included if the total for the project was the lowest.) |
|||
|
All Prices/County/Region |
These options allow you to select from All Prices, or prices from projects bid in a SPECIFIC COUNTY, or a SPECIFIC REGION. The Department of Transportation in each state defines the regions. |
|||
|
All Prices or Date Range |
The options allow you to select from ALL PRICES or only prices from projects bid within a specified Date Range. The FROM date must be earlier than the TO date. All the dates listed in each list box are actual letting dates for the selected state. |
|||
|
Project Size |
Selecting a project size range allows you to load prices from projects whose low bidder was within a specified dollar range. To select all projects over a certain size, enter the FROM value and leave the TO value set to zero. |
|||
|
Specific Contractor |
This option allows you to load average prices for a selected contractor. All the contractors that have prices in the database will be diplayed in the dropdown box. | |||
|
Date Last Loaded |
This field will display the last date you loaded the averages from the tabs database as well as the options you last selected. | |||
|
Load |
After you have made your choices for the options, press the LOAD button to start the process of loading the averages. The amount of time it takes to load the averages depends on the following factors:
|
|||
|
Cancel |
Closes the screen WITHOUT Loading any data |
There are a number of different options available to print the Pay Item Database. To print the database, either press the PRINT button or select FILE: PRINT from the menu. The print options window will then be displayed as shown in Figure 5, below.
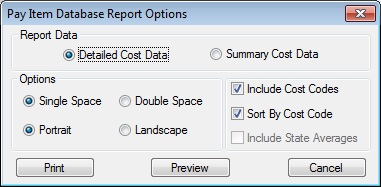
Figure 5
Report Data This option allows the user to select the amount of detail printed on the report. The Summary report will print the Pay Item, Description, Default Unit description, and a Total unit price. The Detailed report will print all of the information on the Summary report, plus the cost breakdown of the any entered plug price (labor, equipment, material, supplies, subcontracts, hauling, and other costs). Single/Double Space Double spacing makes the report easier to read. However, if there is a large number of Pay Items in the file, the number of pages can be cut in half by single spacing. Portrait/Landscape If you select LANDSCAPE, report will print “sideways” on the page (if your printer supports landscape printing). Most Inkjet and Laser printers support this type of printing. The landscape setting will make the report easier to read. Include Cost Codes Sort by Cost Code If you include the Cost Code on the report, you will have the option to sort the report based on the Cost Code; otherwise, the report will be sorted based on the Pay Item Number. Incl. State Averages This option allows you to include the State Averages on the report. This option is only available on the SUMMARY COST DATA. Print/Preview These buttons allow you to send the report directly to the printer (PRINT button) or to the screen (PREVIEW).
This option allows you to include the Cost Codes on the report.
These 2 options allow you to select how the pay item database will be sorted. You must decide whether to sort based on the pay item NUMBER or pay item VALUE. Sorting based on the pay item NUMBER will sort the items by the text (or ASCII) value. See the table below for an example. Be careful that you select the proper sorting option. If the pay item number contains any characters other than the numbers from 0-9, then you must sort by pay item number.
Pay Item NUMBER Pay Item VALUE
1
1
10
2
100
10
2
20
20
100
200
200
|
Pay Item Number |
|
Description |
| Category (then Pay Item Number) |
| Phase Code |
| Pay Item Value |
Options: Freeze Numbers
This option allows you to “freeze” a specified number of columns. A “frozen” column does not scroll off the screen when you move to the right. For example, if you wanted to always see the pay item number and description, you will need to set the number of frozen columns to 2.
As mentioned earlier, there are two different types of views that can be selected. You can view either the PLUG prices(if any) or the STATE AVERAGE prices. You can switch back at any time. See the table below for what information is displayed for each option.
PLUG PRICES STATE AVERAGES Labor State Average Unit Price Equipment High Material Low Supplies Count Sub
Other
Hauling
This option allows you to import pay item data from a spreadsheet file into the current pay item database. After selecting this option, you will see the screen shown in Figure 6.
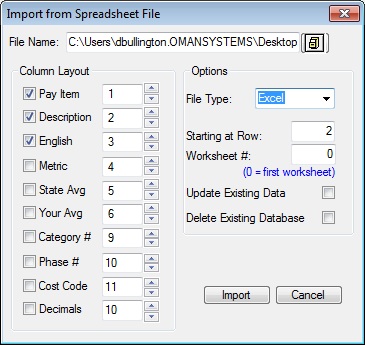
Figure 6
|
Column Layout |
Make sure to check the box next to all item data that you want to import AND enter the column number that contains that data in the spreadsheet file. |
|
File Type |
Select the spreadsheet file type that you will be importing from. The available options are: Excel, Lotus 123, Paradox, Quatro Pro and Symphony. |
|
Starting at Row |
Enter the first row in the spreadsheet file that contains data. NOTE: The data in the spreadsheet file should not include any blank lines. The import routine will stop at the first blank line that is found in the spreadsheet. If blank lines exist in the import file, they must be deleted prior to import. |
|
Worksheet # |
If the data is not in the first worksheet, then you can enter the number of the worksheet that contains the data. NOTE: Microsoft uses a zero based counting system so 0 is the first worksheet and 1 is the second worksheet. |
|
Update Existing Data |
Check this box if you want the system to check your existing database to make changes to matching items and add any new items. |
|
Delete Existing Database |
Check this box to delete all your existing items and import the spreadsheet file as a new database. |