The maximum number of labor rate files that can be set up at any one time is 999. Each labor rate file can contain an unlimited number of different personnel classifications (foreman, labor, operator, etc.). However, in most cases the number will rarely exceed 40. The rate for each labor classification is made up of the base rate (the rate that employee is paid), employer-paid payroll taxes, employer-paid insurance, employer-paid fringe benefits, and overtime. Each rate can be set up on an hourly, weekly, or monthly basis.
See Estimating and Advanced Features for more information about how to incorporate labor items into an estimate.)
Figure 1, below, shows the main spreadsheet view for a “Labor Database.” From the "Labor Database" window you can add, delete, edit, and print labor rate items. You can also add and delete Labor Rate Databases as well as edit and change settings for each database
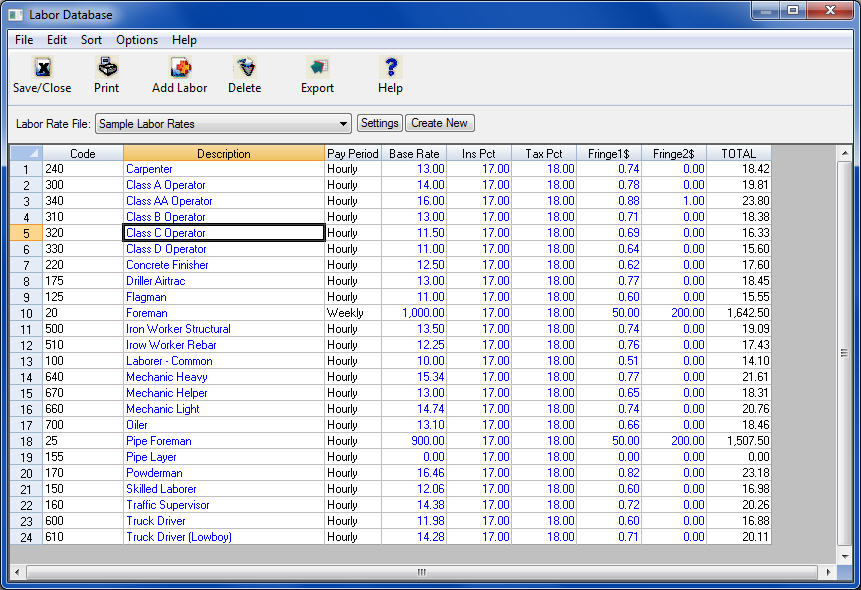
Figure 1
|
The “Toolbar” at the top of the screen gives you quick access to commonly used menu commands. Listed below are descriptions of each button: |
| Press the button to close the labor rate database window. Closing will automatically save any changes made to the database. |
|
Pressing the PRINTER icon will display the report options screen for the labor database. See the FILE: PRINT section later in this chapter for all the report options. |
| Press the ADD to add a new record to the current labor database. |
| Press the DELETE to delete the currently selected labor item from the database. |
| Press EXPORT to export the current rate file to an Excel spreadsheet file. |
|
Code |
This field is NOT editable. This is a unique 15-character(maximum) code that identifies each labor item, established when an item is originally placed in the database. To change an existing code you must delete the existing item and add a new item. |
|
Description |
The description field can be up to 100 characters in length (Superintendent, laborer, etc.). |
|
Pay Period |
This field is the time period that the rate is calculated by. Available time periods are: Hourly, Weekly, or Monthly. Note that overtime premiums will be calculated only for Hourly rates. To change the pay period, simply double click on the pay period item. The system will automatically toggle between the three options and adjust the rate accordingly. |
|
Base Rate |
This is the base rate for the current labor item. The rate is based upon the pay period selected in the previous field. |
|
Insurance |
Depending on how the settings for the current labor rate file are set, this column will either be the insurance cost as a percent of the base rate or the actual dollar per pay unit for the current labor item. |
|
Tax |
Depending on how the settings for the current labor rate file are set, this column will either be tax cost as a percent of the base rate or the actual dollar per pay unit for the current labor. |
|
Fringe 1 |
Depending on how the settings for the current labor rate file are set, this column will either be fringe benefit cost as a percent of the base rate or the actual dollar per pay unit for the current labor. |
|
Fringe 2 |
Depending on how the settings for the current labor rate file are set, this column will either be additional fringe benefit cost as a percent of the base rate or the actual dollar per pay unit for the current labor. In many cases, you may have the Fringe cost entered as a percent and the Fringe2 cost entered as a dollar amount. |
|
Total |
This column displays the total burdened cost for each labor rate item. The rate on this screen does NOT include any overtime premium. The total rate including overtime will be used within an estimate based on the work schedule you choose for a project. |
|
Labor Rate File |
This list box allows you to select the labor rate file to display. |
|
|
This option will display a window allowing you to enter certain information about the current labor database. (See the FILE: DATABASE SETTINGS section later in this chapter for more information on this screen.) |
|
|
This option allows you to create a new labor rate database. (See the CREATE NEW LABOR RATE FILE section later in this chapter for more information on creating a new labor rate file.) |


Listed below are the different options available from the pay item database menu.
|
REPLACE ALL TAX |
This option allows you to easily replace all the tax percentages for all the labor items in the current labor rate file. After selecting this option you will be prompted to enter the new tax rate. |
||||||
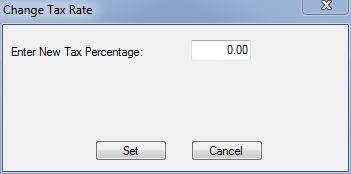 |
Enter the new tax rate and press the SET button. The system will replace all the tax percentages with the new tax percentage. WARNING: You should only use this option if the tax rate is set up to be entered as a percentage. |
||||||
|
REPLACE ALL INSURANCE |
This option allows you to easily replace all the insurance percentages for all the labor items in the current labor rate file. After selecting this option you will be prompted to enter the new insurance rate. |
||||||
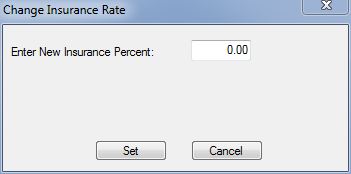 |
Enter the new tax rate and press the SET button. The system will replace all the insurance percentages with the new tax percentage. WARNING: You should only use this option if the insurance rate is set up to be entered as a percentage. |
||||||
|
REPLACE ALL |
This option allows you to easily replace all the fringes percentages for all the labor items in the current labor rate file. After selecting this option you will be prompted to enter the new fringes rate. |
||||||
|
Enter the new rate and press the SET button. The system will replace all the insurance percentages with the new fringes percentage. WARNING: You should only use this option if the fringes rates are set up to be entered as a percentage. |
|||||||
|
SORT |
There are three different orders the Labor Database can be sorted. The sort option you select on this screen will be the order in which the labor classes will be displayed within an estimate. |
||||||
|
You can also change the sort by double-clicking on the column headings.
|
|||||||
|
DELETE CURRENT RATE FILE |
This option will delete the currently displayed rate file. WARNING: Once a rate file has been deleted, ALL of the labor classes within that file are also deleted and it cannot be recovered (unless you have created a back-up). |
||||||
|
CREATE NEW RATE FILE |
This option allows you to create a new labor rate file. The new rate file will contain all of the labor classes the currently displayed file contains (in essence, a copy of the current labor rate file is made and given a new name). |
||||||
|
OPTIONS: EDIT RATE FILE SETTINGS |
This screen allows you to enter default values for the current Labor Rate Database. The settings on this screen are unique to each labor rate file. The Overtime Factors, Misc. Settings, and Work Schedule can be changed for each estimate. |
Figure 2 shows the Labor Settings screen. Each of these settings is explained below.

Figure 2
|
Overtime Premium |
These fields allow you to enter the default Overtime Premium factors for each displayed number of work hours. These settings are used to calculate the overtime cost when you print a report. When you setup a new estimate, you will be able to overwrite these settings. Note that the overtime cost is only calculated on hourly rate items. Weekly and Monthly labor items do not contain any overtime cost calculations. |
|
Default Percentages |
These fields allow you to enter a default tax, insurance, or fringe percentage for the current Labor Rate Database. After entering the desired percentage(s), press the “Replace” button to change all of the rates in the current database. You are not required have to have the same tax, insurance, or fringe rates for each labor item; you can change the tax rate for each individual item on the database screen. Note: This option is not available if you are editing a Project rate file |
|
Enter Cost as $ or % |
These buttons allow you to select how the labor burden items will be displayed on the database window. You can select either “Dollar” or “Percent.” Selecting “Dollar” allows you to enter a fixed dollar amount for each item, and “Percent” allows you to enter a percentage (of the base rate) for each item. |
|
Misc. Settings |
These settings tell the system how to calculate the total labor rate. You will be able to change these settings within an estimate. |
|
Work Schedule |
These fields allow you to enter the work schedule. The work schedule is used by the system to calculate the overtime costs and is only used so you can print a labor rate listing showing the overtime amounts. The work schedule for an estimate is entered for each individual estimate. |
|
Save/Cancel |
These buttons allow you to save or cancel the settings window and return you to the Labor Rate Database window. |
ProEstimate HEAVY allows you to have up to 999 different Labor Rate Databases. It is strongly recommended that you use the same codes to identify the same labor class in all of your labor rate databases. For example, if you use “100” to identify a “Common Laborer,” then you should use this same code to identify “Common Laborer” in all of your Labor Rate Databases. To help you keep the same codes for each database when you create a new database, the system will copy all of the existing records from the currently selected database into the new database.
Follow these steps to create a new database:
|
Step 1 |
Select the Labor Rate Database that you wish to copy from. |
|
Step 2 |
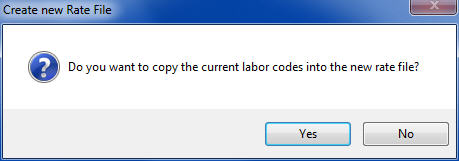
Press the "Create New" button. You will first be prompted to determine if you want to copy the rates from the current rate file into the new rate file. See Figure 3, below. Answer YES. It is critical that you maintain a consistent labor rate coding system from rate file to rate file. This is important when loading crews from the crew database or when copying tasks from the master project or other projects. If you change the rate codes, then these operations will not work properly. Also, if you change the rate file for an existing project, then the new rate file must have the same labor codes as the old rate file. |
|
Step 3 |
Enter a name for the new rate file (this name should be descriptive enough for you to easily identify the rate file). Examples of rate file names would be “TN-DOT Rates” or “FWHA Rates.” |
|
|
|
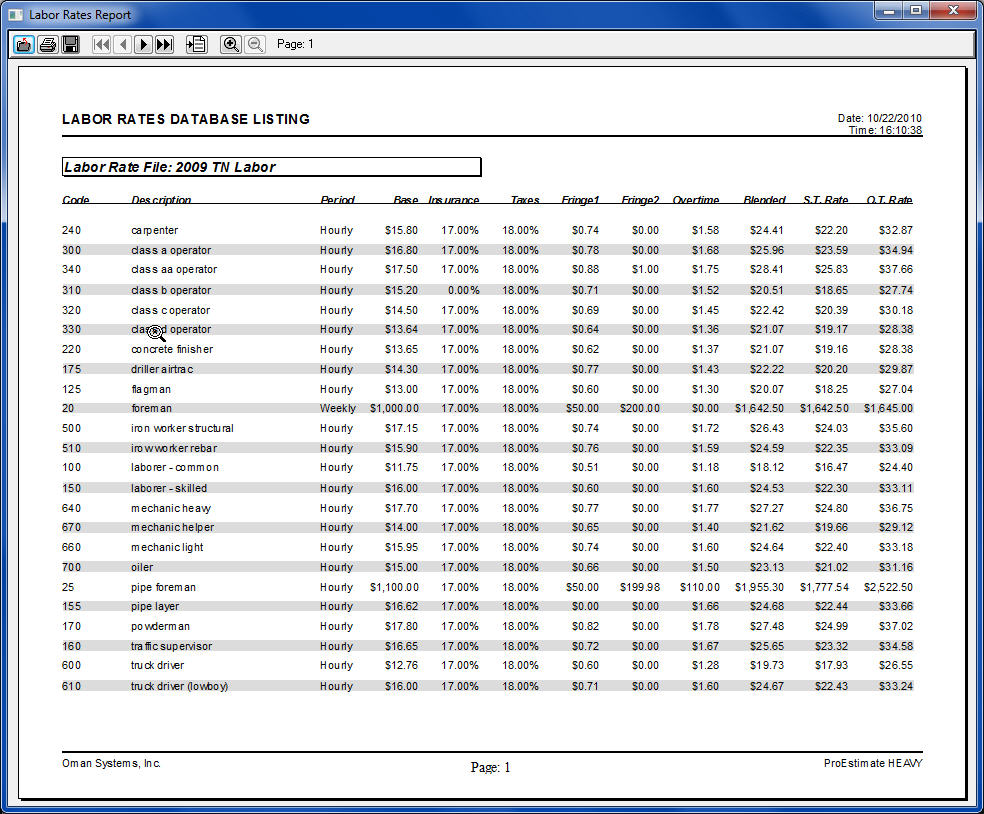
| LABOR DATABASE REPORTS | When you select “Print” from the Labor Rates Database window, the screen in Figure 4 will appear allowing you to select the rate reports to print. The report will be printed showing each labor class as well as the rates for each class. NOTE: The total rates shown on this report are based on the settings you have entered on the “Settings” screen. These may or may not be exactly the same total rates within an estimate, depending on the settings you have entered for the project. Figure 5, below, shows a sample labor database report.
|
|
Print Straight Time |
Prints the straight time rate on the report. |
|
Print Overtime Rate |
Prints the overtime rate on the report. This is the actual hourly rate for each overtime hour. |
|
Print Blended Time |
Prints the “blended” rate on the report. The blended rate is calculated by computing the total wages for a workweek and dividing by the number of hours worked. The blended hourly rate contains the base rate plus the overtime premium. |
|
|
|