Overview: The Crew Database, when established and maintained properly, is a powerful option in ProEstimate HEAVY. It allows the estimator to set up and maintain a library of work crews (complete with production rates, labor, equipment, material, subs, and other costs) and to load these crews from the Crew Database into an estimate. A crew can be entered into the Crew Database in either of two ways. The first method is to set up the crew in the Crew Database module, as detailed in this chapter. The second method of entering a crew is by saving the crew from within an estimate (see Estimating/ Advanced Options for details on creating a task and then saving that task in the Crew Database).
To EDIT the Crew Database, select "DATABASES:CREW DATABASE" from the Main Menu. The first crew in the Crew Database will be displayed as shown in Figure 1. Each of the items on this screen is explained below.
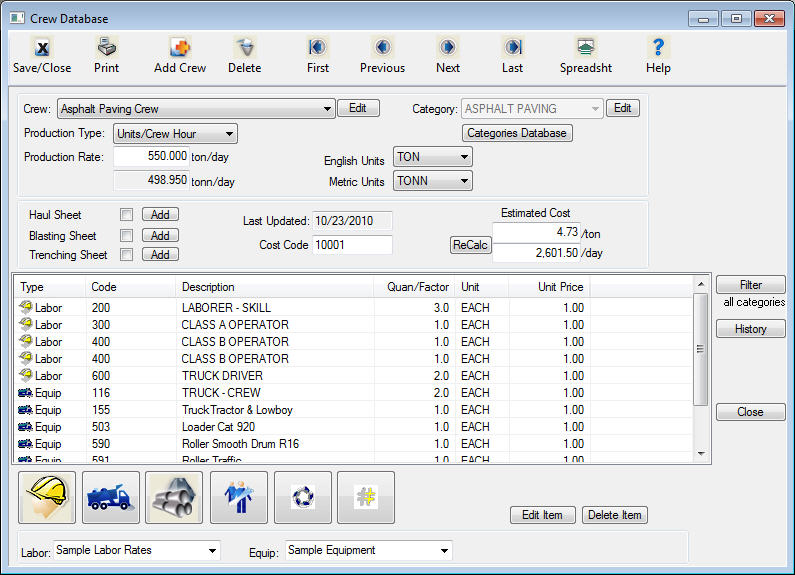
Figure 1

|
Tool bar
|
The “Toolbar” displays an array of buttons for the more commonly used options for the database. Listed below are the functions of each button:
|
|
Save/Close
|
Closes the Crew Database window and saves any changes. |
|
|
Prints a report showing the contents of the database |
|
Add Crew
|
Opens a screen to begin the creation of a new crew |
|
Delete
|
Deletes the currently displayed crew from the database |
|
First
|
Opens to the first crew in the database |
|
Previous
|
Opens the last previously opened item in the database |
|
Next
|
Opens the next crew in the database |
|
Last
|
Jumps to the last crew in the database |
|
Spreadsheet
|
Displays a list of the crews in a spreadsheet view |
|
Crew Data
|
This portion of the Crew Database window displays general information about the current crew. Within this section you can enter the following information:
|
|
Crew Description
|
The description should be descriptive of the type of work the crew performs and allow you to easily identify this crew. To edit or change a crew description, press the EDIT button.
|
|
Crew Category
|
The system allows you to enter a work category for each crew by clicking on the . The category designation serves two purposes. First, the system allows you to filter the Crew Database by category to make it easy to identify or select a crew. Second, when entering materials, the system will initially filter the Material Database by the same category. You can edit the category database by pressing the “Categories Database” button.
|
|
Units of Measure
|
The system allows you to enter both the English and Metric units of measure. This allows you to load this crew into both English and Metric projects, and the system will automatically convert all units to the proper unit of measure.
|
|
Production
|
This is the “default” production rate for the crew. You can change the production rate at any time within an estimate. You can only enter the production rate in English Units (the system will automatically convert to Metric when appropriate).
|
|
Haul Sheet
|
If this box is checked, a Haul Sheet is attached to the current crew. To edit a Haul Sheet, press the "Edit" button.
|
|
Blasting Sheet
|
If this box is checked, a Blasting Sheet is attached to the current crew. To edit a Blasting Sheet, press the “Edit” button.
|
|
Trenching Sheet
|
If this box is checked, a Trenching Sheet is attached to the current crew. To edit a Trenching Sheet press the "Edit" button |
|
Cost Code
|
The Cost Code is used by the system when exporting to an accounting or budgeting system. |
|
Estimated Cost
|
The estimated cost for the crew is displayed in the lower right corner of this section. This is only an estimate since factors such as overtime, fuel rates, and sales tax may vary from project to project. To recalculate the crew cost, simply press the “ReCalc” button.
|
|
Crew Detail
|
This portion of the Crew Database window displays all of the detailed cost items included within the crew. See the next section for details on entering each cost type into a crew.
|
All of the information displayed in this window is the same as within an estimate EXCEPT the Quantity. Within the Crew Database, you enter a factor instead of a quantity. This factor operates differently if the item is Labor/Equipment or Material/Supplies/Sub/Other cost type.
Labor & Equipment Factor
When a crew is set up in the Crew Database, the number of hours the crew will be used is unknown, until the task that the crew will be loaded into is created. So, a production factor is used to determine how many hours should be used for each labor and equipment item.
When a task is set up for a job, the number of hours will be either the actual number of hours entered by the estimator or computed based on a production rate and quantity. This number of hours is then used as the basis when the crew is loaded from the Crew Database.
When loading a crew that has labor and/or equipment items, the program will compute the hours for each labor and/or equipment item by multiplying the number of hours of the task by the factor entered for each labor or equipment item. The default factor of one (1) will load the cost element with the same number of hours as the task. A factor of 0.5 will load the cost element with 50% of the hours of the task, and a factor of 2.0 will be twice the number of hours.
The factor for material, sub and other costs works a little different than the factor for labor and equipment. This factor is used in place of entering a quantity for the item. Since the task quantity will not be known until the task is created in a job, the quantity to use cannot be directly entered. There are three different ways this factor works.
|
FIRST
|
if a factor of zero (0) is entered, then, regardless of the task quantity, the quantity of the cost item in the crew will be loaded with a quantity of One (1). |
|
SECOND
|
if a factor of one (1) is entered, the quantity of the cost item in the crew will be the same as the quantity of the task. |
|
THIRD
|
if a number other than zero or one is used, the quantity of the item will be computed by multiplying the factor times the quantity of the task. |
|
See the example below for an example of how the above described factors are actually implemented.
|
|
** EXAMPLE **
Assume a task is created for 18” Concrete Pipe. The Pay Quantity for the task is 1,000 LF and the task duration is 100 hours (10l.f./hour). Also assume that the following “Small Pipe Crew” is stored in the Crew Database with the following cost elements:
| Labor/Equipment | Factor | Actual number of hours loaded |
| Foreman | 1.00 | 100 |
| Pipe Layer | 1.00 | 100 |
| Dozer Operator | 0.75 | 75 |
| Backhoe | 1.00 | 100 |
| D6 Dozer | 0.75 | 75 |
| Material/Sub/Other | Factor | Actual Quantity Loaded |
| 18” Concrete Pipe | 1.0 LF | 1,000 LF |
| Graded Stone | 0.50 TONS | 500 TONS |
| Utility Permit | 0.00 LS | 1 LS |
Note: Even though the task unit is in LF, the unit stored with each cost element is automatically loaded when the crew is loaded.
Add Crew
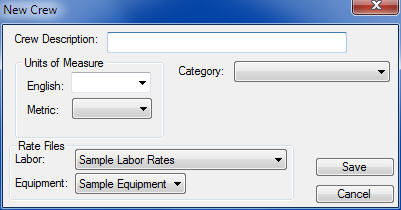
Figure 2
Rate Files
Labor &
Equipment
These two fields tell the system which labor and equipment file to use as the default. When a crew is loaded into an estimate, the labor and equipment file for that project will be used.
Near the bottom of the Crew Database window is a row of buttons that allows you to enter different types of costs into the crew. In this section we will go through each of these options.

Figure 3
LABOR
Pressing the Labor button will display the window shown in Figure 4.(This is a listing of all labor items contained in the currently selected labor database)
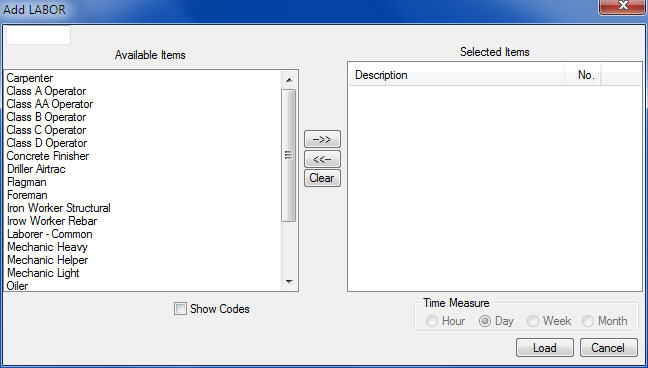
Figure 4
This window allows you to select the labor items to include in the current crew. You can select as many labor items as necessary. You can select an item by double-clicking the left mouse button on any item in the "Available Items" column. Clicking the left mouse button will the increase the count of a specific item and clicking the right mouse button will decrease the count. Press the LOAD button to load the selected items into the crew or press the CANCEL button to close the window without loading any items.
|
Right Arrow
|
Add the selected item to the Selected Items list (same as double clicking and item) |
|
Left Arrow
|
Remove the selected item from Selected Items list. |
|
Clear
|
Clear all the Selected Items |
** AUTO-LOAD LABOR OPTION **
If you have selected the AUTO-LOAD LABOR option on the program preferences screen, any operators assigned to a piece of equipment will automatically be loaded into the crew. You will only need to load those labor items not associated with a piece of equipment (Example: Support Labor).
Pressing the Equipment button will display the window shown in Figure 5. This screen is almost identical to the Labor screen. Check the Do Not Auto Load Labor box if you have the AutoLoad Labor option turned on to temporarily disable that function. This may be useful in times when you want to load a stand-by piece of equipment without the operator.
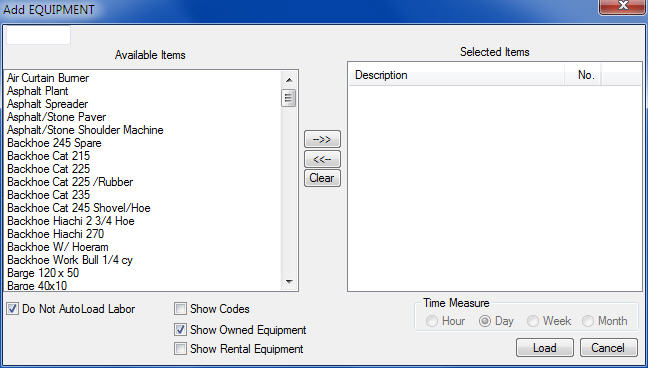
Figure 5
This window allows you to select the equipment items to include in the current crew. You can select as many items as you want. You can select an item by clicking the left mouse button on an item in the "Available Items" column. Clicking the left mouse button will the increase the count of a specific item and clicking the right mouse button will decrease the count. Press the LOAD button to load the selected items into the crew or press the CANCEL button to close the window without loading any items.
|
Right Arrow
|
Add the selected item to the Selected Items list (same as double clicking and item) |
|
Left Arrow
|
Remove the selected item from Selected Items list. |
|
Clear
|
Clear all the Selected Items |
** AUTO-LOAD LABOR OPTION **
If you have selected the AUTO-LOAD LABOR option on the program preferences screen, any operators assigned to a piece of equipment will automatically be loaded into the crew.
Pressing the Material button will display the window shown in Figure 6. From this screen you can select materials, supplies, or asphalt items to load into the crew. You can also enter the minority status of each item.
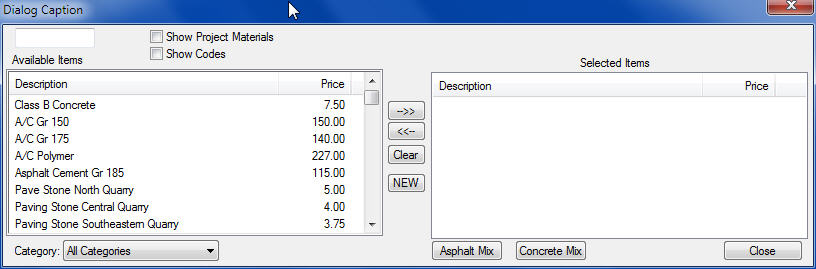
Figure 6
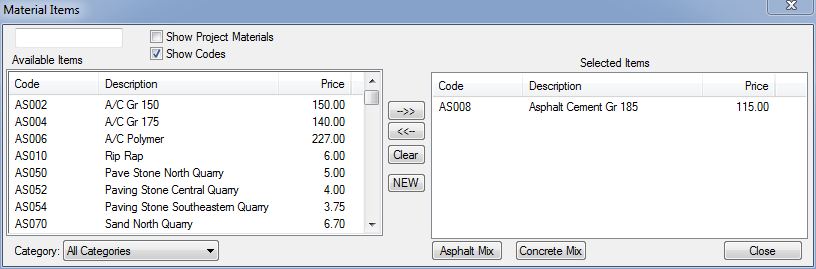
Figure 7
|
Available Items
|
This box displays all of the available material items (in the selected category). You can use the buttons in the middle of the window (Item (6)) or you can simply double click an item to move it from the “Available” window to the “Selected” window.
|
|
Selected Items
|
This box displays all of the material items you have selected to load into the current crew. You can use the buttons in the middle of the window (Item 6)) or you can simply double click an item to move it from the “Selected” window to the “Available” window.
|
|
Category
|
This box displays the currently selected material category. The system will initially display the materials contained in the same category that has been set up for the crew. You can select a different category OR you choose to see all materials in the materials database by selecting the category “All Categories” (which is the first category in the category list).
|
|
NEW
|
If the material you want to add to the crew is not in the Material Database, you can press the NEW button to add it. After pressing this button you will see a screen to enter the Material Code, Description, Unit of Measure, Category, and Material Type.
|
|
Asphalt Mix
|
If you want to add an Asphalt Mix to the current crew, press the ASPHALT button. This will expand the material display to show you the available asphalt mixes in the asphalt database. Figure 7 shows the expanded material screen. |
|
Asphalt Mixes
|
This window displays a list of all the mixes in the asphalt mix database. To select a mix, double click on the desired item and it will be displayed in the “Selected Items” window on the top of the screen.
|
|
Add>>
|
You can select an asphalt item by highlighting the desired item and pressing the ADD button, OR you can simply double click the desired item. After selecting the item, it will be displayed in the “Selected Items” window at the top of the screen.
|
|
Database
|
Within the Crew Database you can only select asphalt items from the Master Asphalt Database. Within an estimate, you will have the option to select mixes from either the Master Database or the Project Database. This option is explained in more detail in the estimating chapters.
|
|
Load
|
Some states will bid asphalt items in two pay items: aggregates and liquid (Tennessee is one example). Most states bid the asphalt as one item. This option allows you to select which price to load |
After selecting all of the material and/or asphalt items to load into the crew, you will be prompted to enter additional information about each item. For each selected item, you will see the window shown in Figure 8.
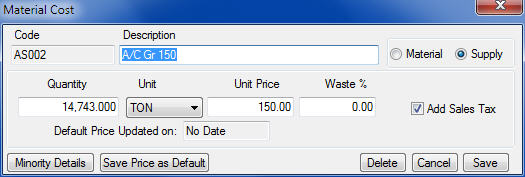
Figure 8
|
Factor
|
Since the quantity is not known, the system uses a factor to determine the quantity of the material item when it is loaded into an estimate. There are three different ways this factor works: |
|
0
|
FIRST, if a factor of zero (0) is entered, then, regardless of the task quantity, the quantity of this item will be One (1). |
|
1
|
SECOND, if a factor of one (1) is entered, the quantity of this cost item will be the same as the quantity of the task. |
|
OTHER
|
THIRD, if a number other than zero or one is used, the quantity of the item will be computed by multiplying the factor times the quantity of the task. For example, if you wanted to load bedding stone for a pipe item and you typically need 0.4 tons of bedding stone per linear foot of pipe, you would enter a factor of 0.4.
|
|
Material or Supply
|
These buttons allow you to select the type of material. Within an estimate, you have the option to mark-up materials and supplies with different amounts. Typically, “Material” is an item that is used within the project and becomes part of the project (examples include Pipe, Concrete, Asphalt, and Stone). “Supplies” are items that are consumed or used in building the project (examples include Lumber, Dynamite, and Nails).
|
|
Unit Price
|
The unit price entered here is only a default. The system will initially load the material price found in the Material Database. When you load the crew into an estimate, you can change the price at that time.
|
|
Add Sales Tax
|
This check box tells the system whether or not to add state sales tax(if any) to this material item. |
SUB
Pressing the Sub button will display the window shown in Figure 9. From this screen you can select subcontractor prices to load into the crew. You can also enter the minority status of each item.

Figure 9
|
Description
|
This is the description of the work. If you want to enter a sub’s name, you must use the Minority Details option (explained below). |
|
Factor
|
Since the quantity is not known, the system uses a factor to determine the quantity of a sub item when it is loaded into an estimate. This is the same as the material factor. There are three different ways this factor works:
|
|
0
|
FIRST, if a factor of zero (0) is entered, then, regardless of the task quantity, the quantity of this item will be One (1). |
|
1
|
SECOND, if a factor of one (1) is entered, the quantity of this cost item will be the same as the quantity of the task. |
|
OTHER
|
THIRD, if a number other than zero or one is used, the quantity of the item will be computed by multiplying the factor times the quantity of the task. For example, if you wanted to load bedding stone for a pipe item and you typically need 0.4 tons of bedding stone per linear foot of pipe, then you would enter a factor of 0.4.
|
|
Unit Price
|
The unit price entered here is only a default. When you load the crew into an estimate, you can change the price at that time. |
|
Minority Details
|
The minority classification check boxes are not active in this selection. |
Pressing the “Other” button will display the window shown in Figure 10. From this screen you can load indirect, hauling, or other costs into the crew.
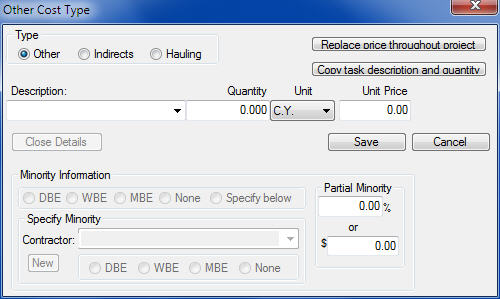
Figure 10
|
Type
|
These check boxes allow you to designate the cost type for the current item. You can choose from the following three options:
|
||||||||||||
|
Description
|
This is the description of the work item. If you enter a contractor’s name, you can also use the Minority Details option (explained below).
|
There may be times when you do not want to actually enter crew details and you know the unit price you want for a specific task. In these cases, you can use the PLUG option to enter the unit price for each cost type. Pressing the PLUG button will display the screen shown in Figure 11.
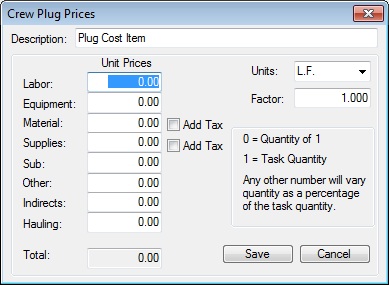
Figure 11
|
Unit Prices
|
Using these fields, you can simply enter the unit prices for each of the eight cost types. These unit prices will be loaded into the estimate when the crew is loaded. You can change the prices at any time within the estimate.
|
||||||||
|
Total
|
(READ ONLY) The system will automatically total the unit prices as you enter them.
|
||||||||
|
Units
|
By default, the system will display the unit of measure for the crew. However, you can change the unit of measure on this screen.
|
||||||||
|
Factor
|
Since the quantity is not known, the system uses a factor to determine the quantity of a sub item when it is loaded into an estimate. This factor is the same as the material and sub factor described above. There are three different ways this factor works.
|
||||||||
|
Add Tax
|
If you want the system to automatically add sales tax to either the material or supplies, simply check either or both of these boxes.
|
ProEstimate HEAVY allows you to set up a “Hauling Sheet” for a task. A “Hauling Sheet” is a special worksheet that allows you to enter hauling information (haul distances, load and unload times, loading and hauling capacities), then assists you in determining crew production rates.
BLASTING SHEET
ProEstimate HEAVY allows you to set up a “Blasting Sheet” for a task. A “Blasting Sheet” is a special worksheet that allows you to enter various rock drilling information (drill patterns, drill production, material requirements) then assists you in determining crew production rates and material quantities.
TRENCHING SHEET
ProEstimate HEAVY allows you to set up a “Trenching Sheet” for a task. A “Trenching Sheet” is a special worksheet that allows you to enter pipe trench information (run length, pipe size, trench dimensions, bedding information), then assists you in determining excavation and bedding stone quantities.
After you select the “Print” option within the Crew Database, you will see the print options screen shown in Figure 12.
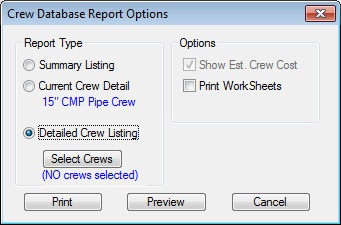
Figure 12
|
Report Type
|
The “Summary Listing” report will list each crew along with the default production rate, units of measure, and, optionally, estimate hourly cost. The “Detailed Crew Listing” will print the detailed contents of each crew, one page per crew.
|
|
Select Crews
|
This option is only available if you select the “Detailed Crew Listing” as the Report Type. Using this option, you can select the crews to print.
|
|
Options
|
These options vary depending on which Report Type you select. |
|
Show Est. Cost
|
This option is available only for the “Summary Listing” report type. Select this option to print the “estimated” per hour crew cost. Remember that the Crew Cost within the crew database is only an approximation. The actual crew cost when you load the crew into an estimate may change due to many factors like work schedule, fuel costs, tax rates, etc.).
|
|
Recalculate Crews
|
This option is available for either report type. Select this option to force the system to recalculate the estimated crew cost before printing the report. Selecting this option for the “Summary Listing” report type may take a few minutes to complete since the system will have to recalculate every crew. Remember that the Crew Cost within the crew database is only an approximation. The actual crew cost when you load the crew into an estimate may change due to many factors like work schedule, fuel costs, tax rates, etc.).
|
|
Print Worksheet
|
This option is only available for the “Detailed Crew Listing” report type. Select this option to print any worksheets attached to the crew (Hauling, Blasting, or Trenching).
|
|
Print, Preview, Cancel
|
Pressing the PRINT button will send the report directly to the DEFAULT printer with the default printer settings (you will not have the option to select the printer or to change any of the printer settings). Pressing the PREVIEW button will display the report on the screen. From the preview screen, you will have the option to print, export, or cancel.
|