Home > Tasks > Task Cost Detail > Material
Material
|
|
 |
Pressing the Material button will display the window shown in Figure 1. From this screen you can select materials, supplies, and/or asphalt items to load into a task.
|
|
|
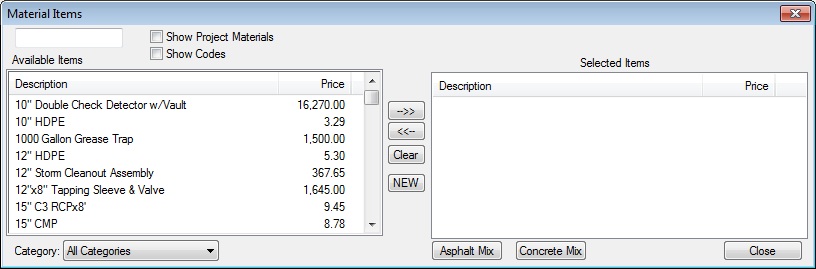
Figure 1
|
|
Available Items
|
This list-box displays all of the available material items (in the selected category). Once an item is highlighted, you can use the buttons in the middle of the window or you can simply double click an item to move it from the “available” window to the “selected” window.
|
|
Category
|
This box displays the currently selected material category. The system will initially display the materials contained in the same category that has been set up for the crew. You can select a different category OR you can choose to see all materials in the materials database by selecting the category “All Categories” (which is the first category in the category list).
|
|
Selected Items
|
This box displays all of the material items you have selected to load into the current task. You can use the buttons in the middle of the window or you can simply double click an item to move it from the “selected” window to the “available” window.
|
|
NEW
|
If the material you want to add to the task is not in the Material Database, you can press the NEW button to add it. After pressing this button you will see a screen to enter the Material Code, Description, Unit of Measure, Category, and Material Type.
|
|
Asphalt Mix
|
If you want to add an Asphalt Mix to the current task, press the Asphalt Mix button. This will expand the material display to show you the available asphalt mixes in the asphalt database. Figure 2 shows the expanded material screen.
|
|
Conrete Mix
|
This button works in exactly the same manner as the Asphalt Mix button. |
|
|
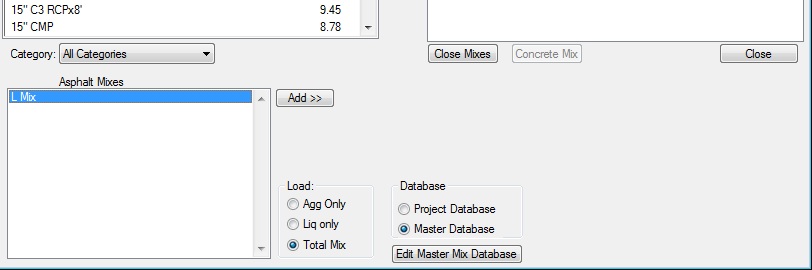
Figure 2
|
|
Asphalt Mix
|
This window displays a list of all the mixes in the asphalt mix database. To select a mix, you can double click on the desired item and it will be displayed in the “Selected Items” window on the top of the screen.
|
|
Add
|
You can select an asphalt item by highlighting the desired item and pressing the ADD button, OR you can simply double click the desired item. After selecting the item, it will be displayed in the “Selected Items” window at the top of the screen.
|
|
Database
|
Within the crew database, you can only select asphalt items from the master asphalt database. Within an estimate, you will have the option to select mixes from either the Master Database or the Project Database. This option is explained in more detail in the previous chapters.
|
|
Load
|
Some states will bid asphalt items in two seperate pay items: aggregates and liquid (Tennessee is one example), while most states bid asphalt as one item. This option allows you to select which price to load.
|
|
|
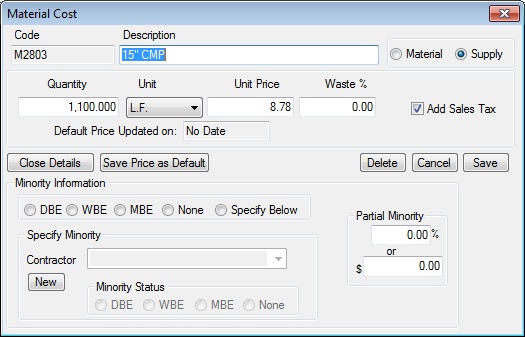
After selecting all of the material items to load into the crew, you will then be prompted to enter additional information about each item. For each selected item you will see the window shown in Figure 3.
|
|
|
|
Figure 3
|
|
Quantity
|
This field allows you to enter a quantity for this material item. The system will default to the task quantity, but you can enter any quantity you like.
|
|
Material or
Supply
|
These buttons allow you to select the type of material. Within an estimate you have the option to mark-up materials and supplies by different amounts. Typically, “Material” is an item that is used within the project and becomes part of the project (examples include Pipe, Concrete, Asphalt, and Stone). “Supplies” are items that are consumed or used up in building the project (examples include Lumber, Dynamite, and Nails).
|
|
Unit Price
|
The unit price entered here is only a default. The system will initially load the material price found in the material database. When you load the crew into an estimate, you can change the price at that time.
|
|
Waste %
|
This field allows you to add a waste percentage, if any. |
|
Add Sales Tax
|
This check box tells the system whether or not to add sales tax to this material item. |
|
See also