Home > Creating/Managing Estimates > Creating an Estimate
Creating an Estimate
| The first screen displayed when the Project List icon is selected is the “Project List” window as shown in Figure 1. From this window you can open or delete an existing estimate, load an estimate previously saved to a file, or create a new estimate. In this section we will discuss the steps to create a new estimate file. For all the other file related options on this screen, see File Maintenance.

Figure 1
|
|
To start a new estimate select the “Create New” button at the bottom of the screen shown in Figure 1. Once selected, you will see the window shown in Figure 2. This window allows you to select the default settings the system should initially use when setting up a new estimate. If you are not sure which option to select, ask another user on your network or select the “Load Master Defaults" option.
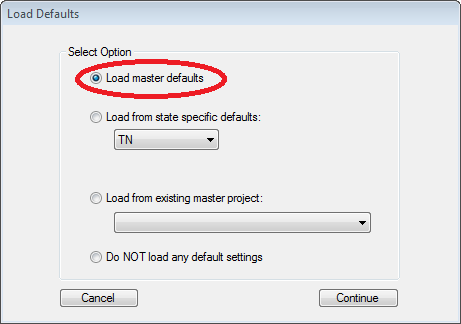
Figure 2
|
|
After you select the desired option, press the CONTINUE button and the “New Project Wizard" will start. The Wizard will take you through each of the steps needed to create a new estimate. Figure 3 shows the first screen.
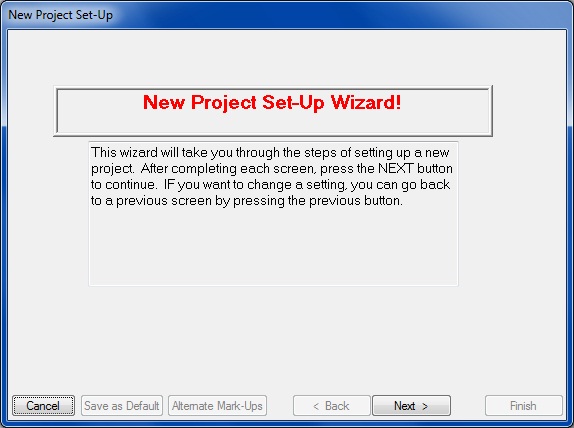
Figure 3
|
|
Click the NEXT button to continue the Set-Up Wizard
NEW PROJECT SET-UP - MAIN PROJECT SETTINGS
This screen (Figure 4) allows you to enter general information about the current project estimate. This information can be changed at any time.
.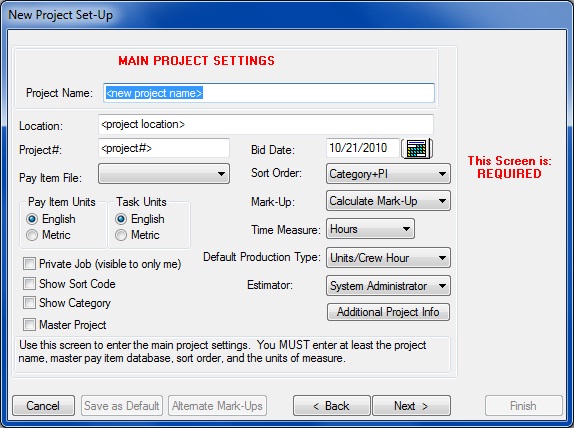
Figure 4
|
|
|
Project Name (Required)
|
This field is the name of the project. This name will be used throughout the system and on all reports to identify the project. The name should be descriptive enough to easily identify this project.
|
|
Location
|
This field is the location of the project; it will be printed on the environment listing and allows the project to be further identified.
|
|
Project #
|
This field is used to enter the Owner's Project Number. The Owner's Project Number, along with the Project Name, will be printed on all reports.
|
|
Pay Item File (Required)
|
This field is used to enter the Pay Item database that the project will use. The "Pay Item File" dropdown list box will display a list of all available Pay Item files. The Pay Item file is used in the estimating program when uploading from a State bid disk into a project, as well as when “Batch loading pay items” into a project. (See the section titled “Import from State DOT Disk” later in this chapter.) For more information about importing pay items see – Estimating/Advanced Options/Import and Export Menu.
|
|
Pay/Task Item Units (Required)
|
This option is used to select whether the job will be bid using English or Metric Units. (See Chapter 4 – Estimating (Advanced Options) for more information about using metric units within ProEstimate-HEAVY.) Additionally you can set the pay items to one unit of measure and the tasks to a different unit of measure. Using different units of measure will allow you to keep the pay items in the unit of measure designated by the owner, but you can put the tasks in a more familiar unit of measure.
|
|
Bid Date (Required)
|
This field is the date the project will be bid. The bid date is used by the program to sort the projects when a list of projects is displayed. The project lists are always listed according to the bid date, with the oldest bid date last. If no date is entered, the current system date is automatically used.
|
|
Sort Order (Required)
|
This option is used to select in which order Pay Items will be displayed both on the screen and in reports. There are three possible options; each is explained below:
|
|
Private Job (Network Version Only)
|
In a network environment, all the estimates are visible to all users on the system. You can use this option to allow only the person who created the job to see the job. If this box is checked, then the project will only be displayed if you are logged in as the System Administrator or the user who created the project.
|
|
Show Sort Code
|
If this option is checked then the Sort code (Line or Reference number) will be displayed in addtion to the pay item number and description.
|
|
Show Category
|
This option will dipsplay the category in addtion to the pay item number and description. |
|
Master Project
|
This option is used ONLY if the project is a MASTER PROJECT. For more information please see the section on Master Projects.
|
|
|
NEW PROJECT SET-UP - LABOR RATES
This screen (Figure 5) allows you to enter specific information and mark-ups for LABOR. This information can be changed at any time.
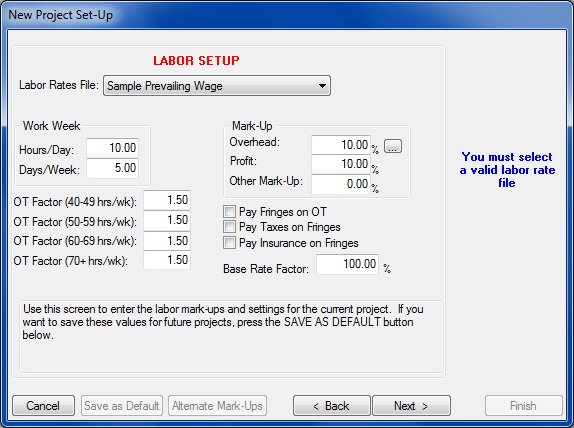
Figure 5
|
|
Labor Rate File
|
This drop-down list-box will display all of the available labor rate databases. You must select a labor rate database to use for this project. NOTE: Once you select a rate file, that file is copied into the estimate and becomes a part of the “project database.” You can make changes to the project database without affecting the original labor rate database.
|
|
Work Week
|
These fields are used to enter the work schedule for the project. The system uses these values in a couple of different ways. First, the system will calculate all overtime premiums based on the work schedule you enter here, as well as the overtime factors also entered on this screen. Also, if you are bidding a project by the DAY, the system uses the work hours per day value to convert the hourly labor or equipment costs to a daily cost.
|
|
Overtime Factors
|
The overtime factors are used by the system to calculate the overtime premium paid on hourly labor classifications. In most cases, you should enter 1.5 in all fields. This means that all labor hours over 40 hours per week will be paid at one and a half times the base rate.
|
|
Mark-Up
|
These values allow you to enter the mark-up to be applied to all labor costs within the project. |
|
Pay Options
|
These three check boxes allow you to change the way the system will calculate the fringe benefits. Labor agreements or local rules and regulations may dictate these options. You may want to check with your accounting department.
|
|
Base Rate Factor
|
This option allows you to factor the base rate of all the labor classes within the project. This option may be useful if you will have to pay a premium (example; night shift premium) on all labor costs within the project and you do not want to change all the base rates in the labor database.
|
|
|
NEW PROJECT SET-UP - EQUIPMENT SETTINGS
This screen (Figure 6) allows you to enter specific information and mark-ups for EQUIPMENT. This information can be changed at any time.
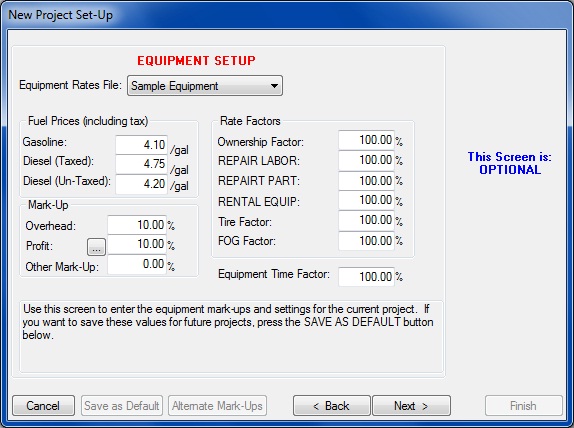
Figure 6
|
|
New Project Set-Up - MATERIALS AND SUPPLIES - Figure 7 - Below
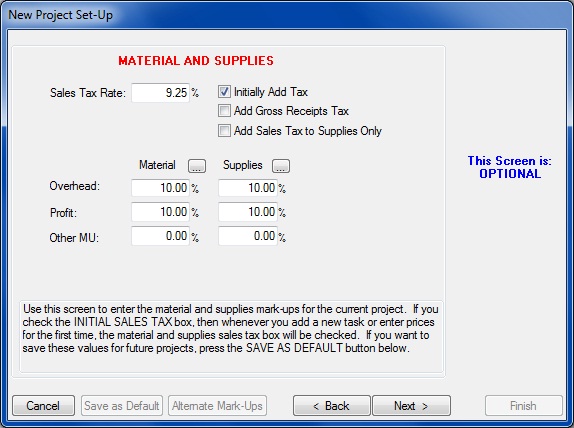
Figure 7
In addition to entering the mark-up percentages for Material & Supply cost types, you can also, if aplicable, enter the sales tax rate that the system will use when adding sales tax to material or supply items. If you check the “Initially Add Tax” box, the system will automatically add sales tax to all material and supply items. You can turn on and off the sales tax calculation for every item within an estimate at any time.
|
|
New Project Set-Up - SUBCONTRACTOR - Figure 8 - Below
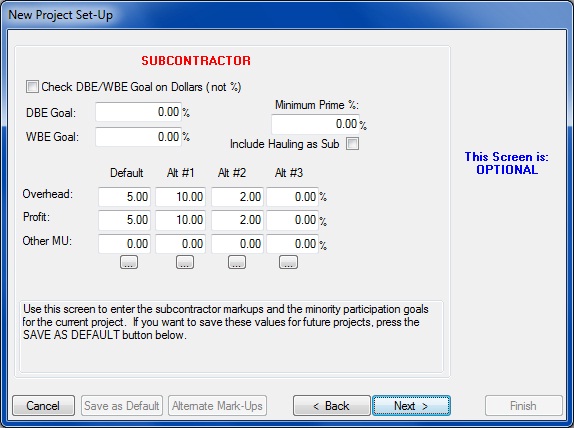
Figure 8
|
|
The SUBCONTRACTOR screen allows you to 1. Enter the DBE &/or WBE Goals as either a percentage (or, if you check the box, as a dollar amount), 2. Set the minimum Prime percentage, 3. Set a default and 3 Alternate markup percentages.New Project Set-Up - OTHER COSTS - Figure 9 -Below
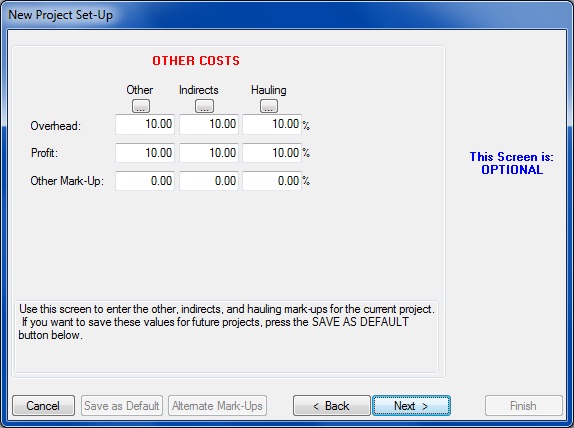
Figure 9
The OTHER COSTS screen allows you to enter mark-up percentages for 3 other cost types - Other, Indirects & Hauling
|
|
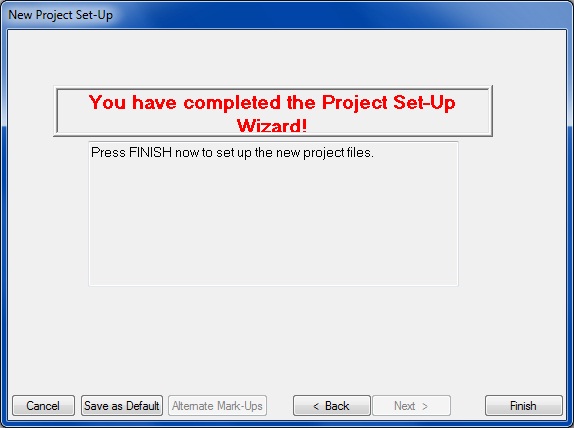
New Project Set-Up - Finish Screen
|
|
Figure 10
|
|
Save as Default
|
This option allows you to save the current estimate settings as the “default” settings. The “default” settings are automatically loaded when you start a New Project Wizard. When creating a new estimate, this option will only be available on the last screen, ensuring that you have entered data for each option. NOTE: This option is only available for existing projects (See Fig. 3.12, below). When setting up a new estimate, this option is not available (grayed out).
|
|
Cancel
|
Pressing this button will cancel the New Project Wizard WITHOUT creating a new estimate.
|
|
Back
|
Pressing this button will display the previous screen in the Wizard.
|
|
Next
|
Pressing this button will display the next screen in the Wizard.
|
|
Finish
|
This button will close the new Project Wizard and create a new (empty) estimate. NOTE: This option is only available on the last screen in the Wizard.
|
|
Alternate Mark-Ups
|
This button allows you to enter additional “mark-up sets” where you can mark-up different pay items with different percentages. You can also use the feature to use different work schedules for different pay items and tasks.
|
|
|
On the last window (Figure 10) you can use the  button to save the current values as your default settings for initial setup. You can edit these values at any time through the project setting screen. After selecting this option you will see the window shown in Figure 11. button to save the current values as your default settings for initial setup. You can edit these values at any time through the project setting screen. After selecting this option you will see the window shown in Figure 11.
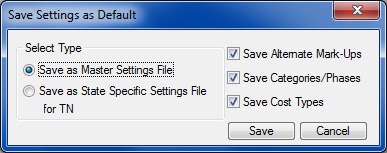
Figure 11
Saving the settings as default will greatly decrease the amount of time it takes to create a new estimate.
|
See also