Home > Tasks > Entering Prices > Editing a Task
Editing a Task
| Once you have added a task, the next step involves adding cost items to that task. In this section we will go through the process of adding different types of costs into a task as well as all of the other options available on the Task Window (Figure 1 below). There are seven different types of cost items you can add to a task: LABOR, EQUIPMENT, MATERIAL/SUPPLY, SUB, OTHER, ASPHALT and PLUG. Each of these cost items are discussed in the next chapter, "Task Cost Detail". |
|
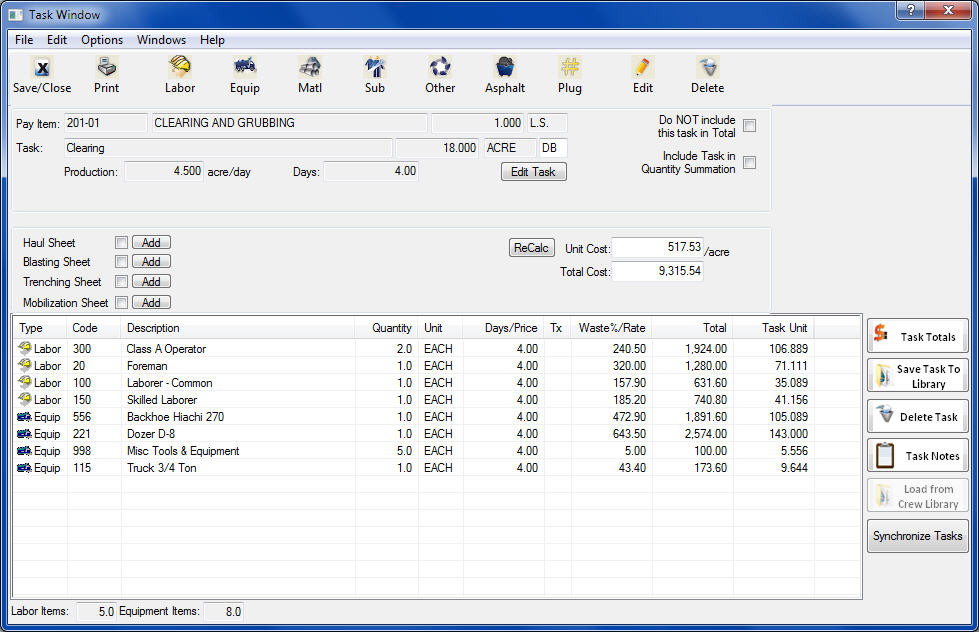
Figure 1
|
|
These following buttons (Figure 2) are used to enter detailed task costs. Each of these options is explained in more detail below.

Figure 2
|
|
| Save/Close |
Pressing this button will save all information in the current task and close the task window. |
| Print |
Pressing this button will print the information in the current task. |
| Labor |
Pressing this button will open the labor database and allow you to add labor item(s) to the current task. |
| Equip |
Pressing this button will open the equipment database and allow you to add equipment item(s). |
| Matl |
Pressing this button will open the materials database allow you to add material and/or supply items to the current task. |
| Sub |
Pressing this button allows you to add a subcontractor item to the current task and an option to enter the name of a specific sub from the subcontractor database. |
| Other |
Pressing this button allows you to add a "miscellaneous" cost item |
| Asphalt |
Pressing this button will open the asphalt/concrete mix database and add an item(s) to the current task. |
| Plug |
Pressing this button allows you to add a "plug" cost not contained in any of the other databases. |
| Edit |
Pressing the "Edit" button will open a window allowing you to edit information about the current task: Description, quantity, units, production rate, and number of days or hours, |
| Delete |
Selecting of the delete button will delete the current task. |
|
|
Pay Item & Task Data
|
This section of the screen displays the pay item and task data. If you need to change any of the task information, press the  button. button. |
|
Haul Sheet
|
A “Haul Sheet” is a special worksheet which allows you to enter hauling information (haul distances, load and unload times, loading and hauling capacities) then assists you in determining crew production rates. A detailed explanation of a hauling sheet can be found later in this chapter. If this box is checked, then a haul sheet is attached to this task. To edit or add a haul sheet to the current task, simply press the Add button (the button will be labeled “Edit” if there already exists a haul sheet for this task). There are two types of hauling sheets you can use:
| Grading |
The grading sheet is set up based on L.F. or MILE hauling distances and C.Y. or TON capacities (Metric: METERS, CUBIC METERS).
|
| Asphalt |
The Asphalt sheet is set up based on MILE hauling distances and TON capacities (Metric: KILOMETERS, METRIC TONS). You are not required to use the Asphalt sheet for asphalt items only.
|
|
|
Blasting Sheet
|
A “Blasting Sheet” is a special worksheet which allows you to enter various rock drilling information (drill patterns, drill production, material requirements), then assists you in determining crew production rates and material quantities. A detailed explanation of a Blasting Sheet can be found later in this chapter. If this box is checked, then a Blasting Sheet is attached to this task. To edit or add a Blasting Sheet to the current task, simply press the Add button (the button will be labeled “Edit” if a blasting sheet already exists for this task).
|
|
Trenching Sheet
|
A “Trenching Sheet” is a special worksheet which allows you to enter information about a pipe trench. It will calculate bedding and backfill stone requirements, and dirt and rock excavation and waste quantities. If this checkbox is checked, then a trenching sheet is attached to this task. To edit or add a trenching sheet to the current task, simply press the Add button (the button will be labeled “Edit” if there already exists a trenching sheet for this task).
|
|
Mobilization Sheet
|
A “Mobilization Sheet” is a special worksheet which allows you to calculate the cost of moving equipment. Using this worksheet, you can calculate cost of the labor and equipment required to move the equipment and the amount of time required.
|
|
Task Detail Window
|
This section of the Task Window displays any/all the detailed cost elements currently loaded into the current task. Use the buttons at the bottom of the screen (Item 5) to add a cost item to the task. The first column displays the cost type. |
| Recalc |
Pressing the "Recalc" button will force the system to recalculate the current task and update the task cost. |
|
|
|
| Pressing the "Task Totals" button(above) will display the total cost, by cost type, for the current task. See Figure 3, below. |
|

Figure 3
|
|
|

|
|
There are two ways to add crews to the crew database. You can simply add a crew within the crew database (See the Databases chapter later in this tutorial for more information on using the crew database), OR you can create a crew within an estimate by pressing the "Save Task to Library" button. After pressing that button, you will see the window shown in Figure 4.
|
|
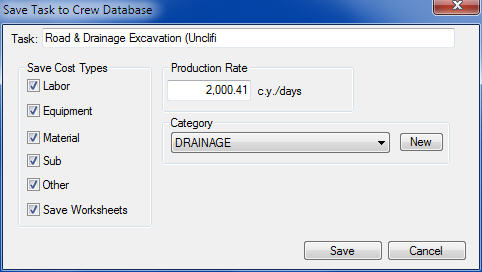
Figure 4
|
|
Task
|
This is the description that will be saved for this task within the crew database. The default description is the task description; however, you can change this to anything you want (up to 100 characters).
|
|
Save Cost Types
|
These fields allow you to select the cost types to save. The default is to save all cost types. To skip a specific cost type, simply uncheck the that box. NOTE: The “Save Worksheets” option is only available for tasks that have a Hauling, Trenching or Blasting Worksheet attached.
|
|
Production Rate
|
This rate of production for the current task and is the default production rate. Remember, this is only the saved default value and can be changed whenever a crew is loaded into an estimate.
|
|
Category (REQUIRED)
|
This dropdown box allows you to select a category for the current task. When loading tasks into an estimate, you have the option to select a task from a specific category. This allows you to narrow the search for the type of crew you are looking for (especially as your crew database gets larger and larger). If the category you need is not in the category database, you can simply press the “NEW” button to add a new work category to the category database.
|
|
SAVE
|
After you have changed any/all of the above settings, including selecting a category for the crew, press the “SAVE” button to save the task into the crew database. Once a crew is saved, it is available for use in this AND any future estimates.
|
|
Delete Task
|
Press the “Delete Task” button to delete the current task from the project and return to the Main Estimate Screen. |
|
Task Note
|
Press the “Task Note” button to enter a note for this task. The task note will print on the task detail report. |
|
See also